- Publié le
Créer une application REST avec Spring Boot et Oracle exécuté dans Docker
- Auteurs

- Nom
- Code Smarter
- @codesmarter_dev
En tant que développeur full stack, combiner Java et Angular pour construire une application est très utile pour améliorer vos connaissances sur les logiciels et outils backend et frontend.
Dans cette étape, vous allez apprendre à créer une application REST avec Spring Boot.
Dans les étapes suivantes, vous verrez comment la sécuriser (avec des tokens JWT) et ajouter une gestion de cache (avec Hazelcast).
Enfin, vous apprendrez à connecter Angular à votre application REST.
1. Outils
- Java 13
- Spring Tool Suite (STS)
- Oracle 12c
- Docker
- Postman
Créer un projet Spring Boot
Ouvrez votre éditeur STS et créez un nouveau projet.

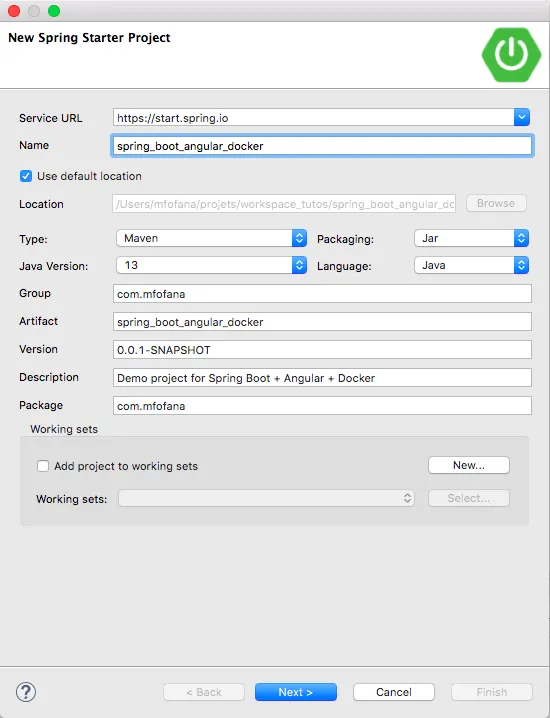
Ajoutez ces modules de démarrage (starter modules).
Ils nous permettront de mettre notre projet en route rapidement, sans avoir à effectuer beaucoup de configuration.

Cliquez pour terminer la création.
À ce stade, l’arborescence du projet devrait ressembler à ceci :

Spring Starter
Le Spring Starter permet d’ajouter plusieurs dépendances dans un seul package et d’éviter les conflits.
spring-boot-starter-parent
Chaque projet Spring Boot construit avec Maven utilise spring-boot-starter-parent dans son pom.xml.
Quelques-unes de ses actions :
- Configure la version de Java et les propriétés
- Gère les dépendances et leurs versions
- Configure le plugin par défaut
spring-boot-starter-web
Pour implémenter un service REST, nous devons ajouter des bibliothèques pour JSON, Tomcat, Spring MVC, et plus encore.
Ce module regroupe toutes ces dépendances.
spring-boot-starter-data-jpa
Ce starter contient les dépendances nécessaires pour persister des données dans une base SQL via JPA avec Spring Data et Hibernate.
spring-boot-starter-test
Il est utilisé pour tester les applications Spring Boot avec des bibliothèques comme JUnit, Hamcrest ou Mockito.
Ajouter la dépendance ojdbc6 et le repository
C’est le driver pour les connexions Oracle.
Vous avez besoin de cette dépendance pour que spring-boot-starter-data-jpa fonctionne correctement.
Exemple de pom.xml
Votre fichier pom.xml devrait ressembler à ceci :
<?xml version="1.0" encoding="UTF-8"?>
<project xmlns="http://maven.apache.org/POM/4.0.0" xmlns:xsi="http://www.w3.org/2001/XMLSchema-instance"
	xsi:schemaLocation="http://maven.apache.org/POM/4.0.0 https://maven.apache.org/xsd/maven-4.0.0.xsd">
	<modelVersion>4.0.0</modelVersion>
	<parent>
		<groupId>org.springframework.boot</groupId>
		<artifactId>spring-boot-starter-parent</artifactId>
		<version>2.2.5.RELEASE</version>
		<relativePath/> <!-- lookup parent from repository -->
	</parent>
	<groupId>com.group</groupId>
	<artifactId>spring_boot_angular_docker</artifactId>
	<version>0.0.1-SNAPSHOT</version>
	<name>spring_boot_angular_docker</name>
	<description>Demo project for Spring Boot + Angular + Docker</description>

	<properties>
		<java.version>13</java.version>
<!-- 		Downgrade maven jar plugin version to avoid Maven Plugin Configuration Error  -->
<!-- 		https://stackoverflow.com/questions/56212981/eclipse-showing-maven-configuration-problem-unknown  -->
		<maven-jar-plugin.version>3.1.1</maven-jar-plugin.version>
	</properties>

	<dependencies>
		<dependency>
			<groupId>org.springframework.boot</groupId>
			<artifactId>spring-boot-starter-data-jpa</artifactId>
		</dependency>
		<dependency>
			<groupId>org.springframework.boot</groupId>
			<artifactId>spring-boot-starter-web</artifactId>
		</dependency>
		<dependency>
			<groupId>com.oracle</groupId>
			<artifactId>ojdbc6</artifactId>
			<version>11.2.0.3</version>
		</dependency>

		<dependency>
			<groupId>org.springframework.boot</groupId>
			<artifactId>spring-boot-starter-test</artifactId>
			<scope>test</scope>
			<exclusions>
				<exclusion>
					<groupId>org.junit.vintage</groupId>
					<artifactId>junit-vintage-engine</artifactId>
				</exclusion>
			</exclusions>
		</dependency>
	</dependencies>

	<repositories>

		<!-- Repository for ORACLE JDBC Driver -->
		<repository>
			<id>codelds</id>
			<url>https://code.lds.org/nexus/content/groups/main-repo</url>
		</repository>

	</repositories>

	<build>
		<plugins>
			<plugin>
				<groupId>org.springframework.boot</groupId>
				<artifactId>spring-boot-maven-plugin</artifactId>
			</plugin>
		</plugins>
	</build>

</project>
Classe de Représentation
Créer la classe Employee
Créez la classe Employee contenant les informations d’un employé :
- Identifiant technique
- Prénom
- Nom de famille
- Adresse
- Code postal
- Ville
- Pays
import javax.persistence.Entity;
import javax.persistence.Id;
import javax.persistence.Table;
import javax.validation.constraints.NotBlank;

@Entity
@Table(name="employee")
public class Employee {
	@Id
	private Long id;
	@NotBlank
	private String firstname;
	@NotBlank
	private String lastname;
	private String address;
	private String zipcode;
	private String city;
	private String country;

	public Long getId() {
		return id;
	}
	public void setId(Long id) {
		this.id = id;
	}
	public String getFirstname() {
		return firstname;
	}
	public void setFirstname(String firstname) {
		this.firstname = firstname;
	}
	public String getLastname() {
		return lastname;
	}
	public void setLastname(String lastname) {
		this.lastname = lastname;
	}
	public String getAddress() {
		return address;
	}
	public void setAddress(String address) {
		this.address = address;
	}
	public String getZipcode() {
		return zipcode;
	}
	public void setZipcode(String zipcode) {
		this.zipcode = zipcode;
	}
	public String getCity() {
		return city;
	}
	public void setCity(String city) {
		this.city = city;
	}
	public String getCountry() {
		return country;
	}
	public void setCountry(String country) {
		this.country = country;
	}
}
JPA Repository
Il contient les méthodes CRUD habituelles et d’autres pour gérer les opérations de base.
Ainsi, pour créer notre propre repository, nous devons étendre Spring Data JPA Repository.
import org.springframework.data.jpa.repository.JpaRepository;
import org.springframework.stereotype.Repository;

import com.mfofana.kodakro.model.Employee;

@Repository
public interface EmployeeRepository extends JpaRepository<Employee, Long>{

}
Exception
Créez une exception qui sera renvoyée lorsqu’une ressource n’est pas trouvée sur le serveur.
import org.springframework.http.HttpStatus;
import org.springframework.web.bind.annotation.ResponseStatus;

@ResponseStatus(value = HttpStatus.NOT_FOUND)
public class ResourceNotFoundException extends RuntimeException {
	private static final long serialVersionUID = 1L;
	private String resourceName;
    private String fieldName;
    private Object fieldValue;

    public ResourceNotFoundException( String resourceName, String fieldName, Object fieldValue) {
        super(String.format("%s not found, %s= %s", resourceName, fieldName, fieldValue));
        this.resourceName = resourceName;
        this.fieldName = fieldName;
        this.fieldValue = fieldValue;
    }

    public String getResourceName() {
        return resourceName;
    }

    public String getFieldName() {
        return fieldName;
    }

    public Object getFieldValue() {
        return fieldValue;
    }
}
Controller
Créez le contrôleur qui sera utilisé pour interagir avec les employés et effectuer les actions CRUD.
import java.util.List;

import javax.validation.Valid;

import org.springframework.beans.factory.annotation.Autowired;
import org.springframework.http.MediaType;
import org.springframework.http.ResponseEntity;
import org.springframework.web.bind.annotation.DeleteMapping;
import org.springframework.web.bind.annotation.GetMapping;
import org.springframework.web.bind.annotation.PathVariable;
import org.springframework.web.bind.annotation.PostMapping;
import org.springframework.web.bind.annotation.PutMapping;
import org.springframework.web.bind.annotation.RequestBody;
import org.springframework.web.bind.annotation.RequestMapping;
import org.springframework.web.bind.annotation.RestController;

import com.mfofana.kodakro.exception.ResourceNotFoundException;
import com.mfofana.kodakro.model.Employee;
import com.mfofana.kodakro.repository.EmployeeRepository;

@RestController
@RequestMapping(path = "/api/employee", produces = MediaType.APPLICATION_JSON_VALUE)
public class EmployeeController {
	@Autowired
	EmployeeRepository employeeRepository;


	@PostMapping("/")
	public Employee postEmployee(@Valid @RequestBody Employee employee){
		return employeeRepository.saveAndFlush(employee);
	}

	@GetMapping("/all")
	public List<Employee> getEmployees(){
		return employeeRepository.findAll();
	}

	@GetMapping("/{id}")
	public Employee getEmployeeById(@PathVariable("id") Long id){
		Employee employee= employeeRepository.findById(id).orElseThrow(() -> new ResourceNotFoundException("Employee", "id", id));
		return employee;
	}

	@DeleteMapping("/{id}")
	public ResponseEntity<?>  deleteEmployee(@PathVariable("id") Long id){
		employeeRepository.deleteById(id);
		return ResponseEntity.ok().build();
	}

	@PutMapping("/{id}/address")
	public Employee updateEmployee(@PathVariable("id") Long id, @Valid @RequestBody Employee employee){
		Employee dbEmployee =  employeeRepository.findById(id).orElseThrow(() -> new ResourceNotFoundException("Employee", "id", id));
		dbEmployee.setAddress(employee.getAddress());
		dbEmployee.setZipcode(employee.getZipcode());
		dbEmployee.setCity(employee.getCity());
		dbEmployee.setCountry(employee.getCountry());
		return employeeRepository.save(dbEmployee);
	}
}
Mettre à jour les propriétés de l’application
Modifiez le fichier suivant :
server.port=8181

# Oracle settings
spring.datasource.driver-class-name=oracle.jdbc.driver.OracleDriver
spring.datasource.url=jdbc:oracle:thin:@localhost:1521:xe
spring.datasource.username=my_username
spring.datasource.password=my_password

## Hibernate Properties
# The SQL dialect makes Hibernate generate better SQL for the chosen database
spring.jpa.properties.hibernate.dialect = org.hibernate.dialect.Oracle12cDialect

# logging
logging.pattern.console=%d{yyyy-MM-dd HH:mm:ss} %-5level %logger{36} - %msg%n
logging.level.org.hibernate.SQL=debug
Base de données
Vous pouvez trouver la procédure d’installation de Oracle Database sur Mac avec Docker ici.
Une fois l’installation terminée, vous pouvez exécuter ce script pour créer la table Employee et insérer des données :
CREATE TABLE EMPLOYEE(
    ID            				INTEGER NOT NULL,
    FIRSTNAME          			VARCHAR2(50) NOT NULL,
    LASTNAME        			VARCHAR2(50) NOT NULL,
    ADDRESS			        	VARCHAR2(150),
    ZIPCODE           			VARCHAR2(5),
    CITY           				VARCHAR2(50),
    COUNTRY           			VARCHAR2(50),
   CONSTRAINT PK_EMPLOYEE PRIMARY KEY (ID)
 );


INSERT INTO EMPLOYEE VALUES (1, 'David', 'JOHNSON', '8456 West Pacific Road','15601', 'Greensburg', 'United States of America');
INSERT INTO EMPLOYEE VALUES (2, 'Larry', 'HOLMES', '9604 Goldfield Avenue','38501', 'Cookeville', 'United States of America');
Arborescence du projet

Tester avec Postman
Démarrez l’application Spring Boot puis ouvrez Postman.
Vous pouvez importer le fichier ci-dessous dans Postman afin de configurer les tests.
{
  "info": {
    "_postman_id": "9b656ea1-22a3-4a93-9d57-60cbd649e805",
    "name": "Employee",
    "schema": "https://schema.getpostman.com/json/collection/v2.0.0/collection.json"
  },
  "item": [
    {
      "name": "create",
      "request": {
        "method": "POST",
        "header": [
          {
            "key": "Content-Type",
            "value": "application/json",
            "type": "text"
          }
        ],
        "body": {
          "mode": "raw",
          "raw": "\t{\n        \"id\": 3,\n        \"firstname\": \"Naomi\",\n        \"lastname\": \"BANKS\",\n        \"address\": \"8335 Bridle Dr.\",\n        \"zipcode\": \"21144\",\n        \"city\": \"Severn\",\n        \"country\": \"United States of America\"\n    }"
        },
        "url": "http://localhost:8181/api/employee/"
      },
      "response": []
    },
    {
      "name": "readAll",
      "request": {
        "method": "GET",
        "header": [],
        "url": "http://localhost:8181/api/employee/all"
      },
      "response": []
    },
    {
      "name": "updateAddress",
      "request": {
        "method": "PUT",
        "header": [
          {
            "key": "Content-Type",
            "value": "application/json",
            "type": "text"
          }
        ],
        "body": {
          "mode": "raw",
          "raw": "\t{\n        \"id\": 3,\n        \"firstname\": \"Naomiii\",\n        \"lastname\": \"BANKS\",\n        \"address\": \"8335 Bridle Dr.zzzz\",\n        \"zipcode\": \"0044\",\n        \"city\": \"Severnooo\",\n        \"country\": \"United States of Americaaaaa\"\n    }"
        },
        "url": "http://localhost:8181/api/employee/3/address"
      },
      "response": []
    },
    {
      "name": "delete",
      "request": {
        "method": "DELETE",
        "header": [],
        "url": "http://localhost:8181/api/employee/3"
      },
      "response": []
    },
    {
      "name": "readOne",
      "request": {
        "method": "GET",
        "header": [],
        "url": "http://localhost:8181/api/employee/2"
      },
      "response": []
    }
  ]
}

Les URLs GET peuvent également être appelées directement depuis le navigateur.
Exemple :
http://localhost:8181/api/employee/all

Conclusion
Dans cet article, nous avons construit une application REST avec des services de base.
Dans la prochaine étape, nous verrons comment ajouter de la sécurité et de la gestion de cache dans l’application Spring Boot à l’aide de Spring Security, des tokens JWT et de Hazelcast.